Train, Validation, and Test Set
- 16 minsSummary
이번 포스팅에서는 인공지능 분야에서 중요한 개념 중 하나인 dataset splitting(데이터셋 분할)에 대해서 알아보겠습니다.
데이터의 개념부터 이해해보자
- 데이터셋 분할에 대하여 알아보기전에, 우선 데이터란 무엇인지 간단하게 알아보겠습니다. 위키피디아에서는 데이터를 아래와 같이 정의합니다.
”data are a set of values of qualitative or quantitative variables about one or more persons or objects.”
- 이를 직역하면, “데이터란 사람이나 물건 등에 대한 사실을 나타내는(표현하는) 값” 이라고 할 수 있습니다. 우리가 날씨를 표현할때에 기온이나 습도 등으로 수치화 하여 표현하는데, 이렇게 각각의 수치가 모두 데이터입니다. 인공지능의 맥락에서 이야기하면, 우리가 만드는 모델에 이러한 data, 또는 ‘값’, 들을 넣어주어 모델을 학습시키고 원하는 결과를 얻을수 있도록 하는 것입니다. 따라서 인공지능에서의 데이터는 모델의 기본 재료이자 가장 중요한 요소라고 이야기 할 수 있습니다.
데이터 분할이란? 굳이? 왜?
- 우리는 모델을 개발할때, 범용적으로 사용할 수 있는 모델을 만들려고 합니다. Unseen data 에 대하여 예측 또는 분류를 하는 것이 목표이기 때문입니다. 여기서 unseen data란, 우리의 모델이 처음 보는 데이터셋, 또는 학습해 보지 않은 데이터를 말합니다. 모델이 실제로 적용되었을때는 처음보는 데이터에 대하여 예측 또는 분류를 할 것이기 때문에, 그만큼 모델의 unseen data에 대한 성능이 좋아야 한다는 것을 우리는 알 수 있습니다.
- 그래서 dataset을 나누지 않고 전부 학습에 사용해 버린다면, 해당 dataset에 대하여만 성능이 좋은 모델을 만들게 될 것이고, 개발한 모델에 대한 성능을 점검 할 수 없을 뿐만 아니라, 실제로 모델이 적용되었을때 좋은 성능을 기대하지는 못 할 것입니다. 따라서 우리가 가지고 있는 dataset을 어떻게 나누고 사용하는지 매우 중요합니다.
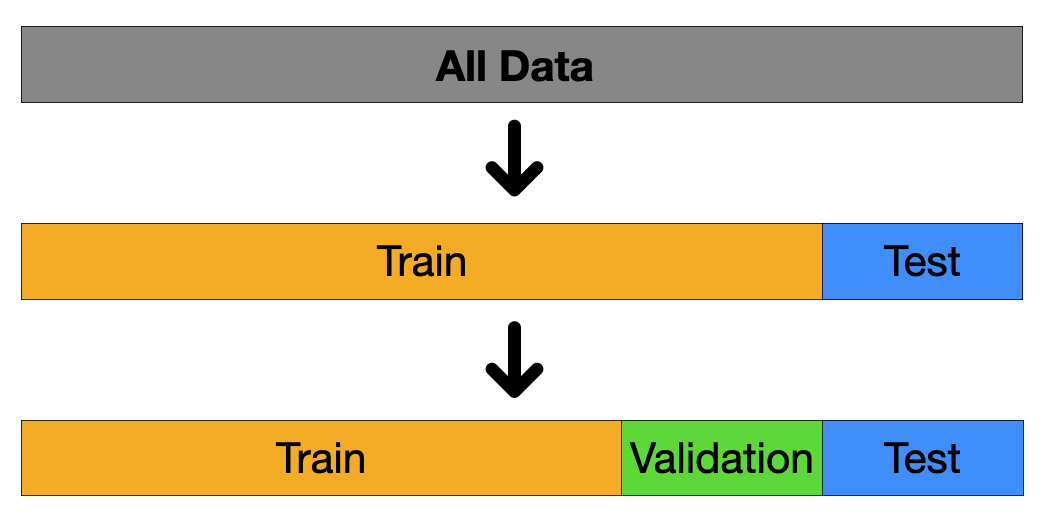
- 그럼 dataset을 어떻게 분할시키는게 좋을까요? 가장 기본적인 분할법은 전체 dataset 을 train set과 test set으로 나누는 것입니다. 전체 dataset 의 80%는 train set으로, 나머지 20%는 test set으로 분류하게 됩니다. 이는 train set을 이용하여 모델을 학습시키고, test set을 이용하여 모델의 성능을 평가하기 위함입니다.
- 하지만 단순히 train 과 test set으로만 나누게 된다면 모델의 성능 검정을 한번 밖에 할 수 없고, test set에 대한 결과를 토대로 모델을 수정하게 된다면 overfitting이 발생할 가능성이 높아지게 됩니다. 따라서 우리는 train set을 한번 더 train set과 validation set으로 나누게 됩니다. 아래의 figure에서 보여지듯이, 대다수의 경우에는 전체 데이터셋을 train, validation, test set을 각 6:2:2 비율로 나누어 사용하게 됩니다.
위와 같이 나누어진 각 데이터셋이 어떻게 사용 되는지에 대해 알아보겠습니다.
Train Set:
- Train set은 온전히 모델의 학습만을 위해서 사용됩니다. Train set을 통해 모델을 학습시키고, parameter나 feature등을 수정해서 모델의 성능을 높이는 작업을 거칠때 사용됩니다.
Validation Set:
- Validation set과 test set은 모델의 학습에 직접적으로 관여하지 않는다는 점에서 공통점을 가지고 있지만, validation set은 학습이 끝난 모델에 적용시켜 test set을 이용한 모델의 평가로 넘어가기 이전에 최종적으로 모델을 fine tuning하는데에 사용합니다. 학습이 완료된 모델이라고 하더라도 epoch을 몇번 돌릴 것인지, 또는 learning rate의 설정은 어떻게 할 것인지 등에 따라 모델의 성능이 달라질 수 있기 때문에, 우리는 validation set을 통해 우리가 만든 모델이 test set 에서, 그리고 실제로 배포 되었을때 높은 성능을 낼 수 있도록 만들어 주는 것입니다.
Test Set:
- Test set은 최종적으로 우리가 만든 모델의 성능을 평가하기 위한 데이터셋이기 때문에 모델의 학습에는 전혀 사용되지 않습니다. Test set을 통해 우리의 모델이 배포된 이후에 실사용 되었을때 모델이 얼마나 좋은 성능을 발휘 할 수 있을지 알아보는 것입니다. 앞서 이야기 했듯이, 모델이 실상에 사용 되었을때도 성공적이기 위해서는 unseen data에 대해 좋은 성능을 발휘하는 것이 매우 중요한데, test set이 unseen data의 역할을 해주어 우리가 만든 모델의 성능을 효과적으로 평가할 수 있도록 도와주는 것입니다.
데이터셋의 특징에 따른 분할
지금까지 어떻게 기본적인 dataset splitting을 진행하는지 알아보았습니다. 하지만 모델의 학습 효과와 성능을 극대화 하기 위해서는 우리가 학습에 사용하는 데이터의 양이나 특성 등을 이해하고 그에 적합한 분할을 해 주는것이 중요합니다. 지금부터는 데이터가 가지고 있을 수 있는 다양한 특징에 따라 어떻게 분할 하는 것이 효율적인지 알아보겠습니다.
데이터의 양
첫번째로는 주어진 데이터의 양에 따라 데이터셋 분할을 하는 방법에 대해서 알아보겠습니다.
데이터가 많은 경우
- 우선 우리에게 주어진 데이터가 많은 경우에 대해 알아보겠습니다. 우선 데이터셋을 6:2:2의 비율로 나누어 사용하는 것은 dataset splitting을 하는 다소 구식의 방식임을 말씀드리고 싶습니다. 불과 10년 전과 비교한다고 하더라도, 컴퓨터 하드웨어의 발전과 점점 쌓여가는 데이터 덕분에 우리는 현재 “big data”의 세상에 살고있다고 말하고, 우리가 다룰 수 있는 데이터의 양이 정말 많아졌다고 합니다. 따라서 우리는 더이상 6:2:2의 비율을 사용하지 않더라도 보다 효율적으로 dataset splitting을 할 수 있게 된 것 입니다.
- 예를들어, 우리가 다루는 데이터셋의 크기가 100, 1000, 또는 10000개 이하라고 했을때, 6:2:2의 비율로 데이터셋을 분할한다면 각 validation과 test set에는 각 20, 200, 2000개의 데이터가 할당될 것입니다. 하지만 만약 데이터셋의 크기가 1000,000에 달한다면, 20%를 각 validation과 test set에 사용한다고 했을때, 그 크기가 자그마치 200,000이나 될 것입니다. 같은 6:2:2의 비율을 사용했지만, 전체 데이터셋의 크기에 따라 각 데이터셋의 크기의 편차가 매우 큰 것을 볼 수 있습니다.
- 그래서 우리는 dataset splitting을 할때에 우리가 생성하고자하는 모델이 어떤 모델인지, 또는 어떤 task를 수행하도록 만들고 싶은지 등에 따라 validation과 test set에 필요한 데이터의 양이 얼마인지 생각해 본 후에 데이터셋 분할을 할 필요가 있습니다. 우리가 만들 모델의 성능을 효과적으로 평가하는데에 필요한 데이터의 양이 2000이라고 가정해 보겠습니다. 만약 우리에게 주어진 전체 데이터셋의 크기가 1,000,000이라면 불과 0.2%만을 각 validation과 test set 에 할당 하더라도 2000개의 데이터를 가져올 수 있을 것입니다. 반면에 우리에게 주어진 전체 데이터셋의 크기와는 상관없이 6:2:2의 비율로 나눈다면 validation set과 test set에 각 200,000씩이나 할당될 것입니다. 그렇게 된다면 우리가 모델을 학습시킬때에 사용할 수 있는 데이터의 양이 줄게 되는 것이고, 이는 좋은 모델을 개발하는데에 효율적으로 데이터셋을 사용하지 않는 것입니다. 따라서 우리는 기존 6:2:2의 비율에 얽매이지 않고, 전체 데이터셋의 크기, 그리고 우리가 각 validation set과 test set에 필요한 데이터의 양을 가늠하여 효과적인 dataset splitting을 할 필요가 있습니다.
데이터가 적은 경우
- 이번에는 데이터가 적은 경우에는 어떻게 해야하는지 알아보겠습니다. 우리에게 주어진 데이터셋의 크기가 지나치게 작다면, 이를 6:2:2의 비율로 나눈다고 하더라도 각 train, validation, test set에 할당되는 데이터의 양이 너무 적어 효과적으로 모델을 학습하고 검증하는데에 어려움을 겪을 수 있습니다. 이럴때에 사용할 수 있는 다양한 dataset splitting 기법들이 존재하지만, 여기서는 k-fold 기법에 대해 알아보겠습니다.
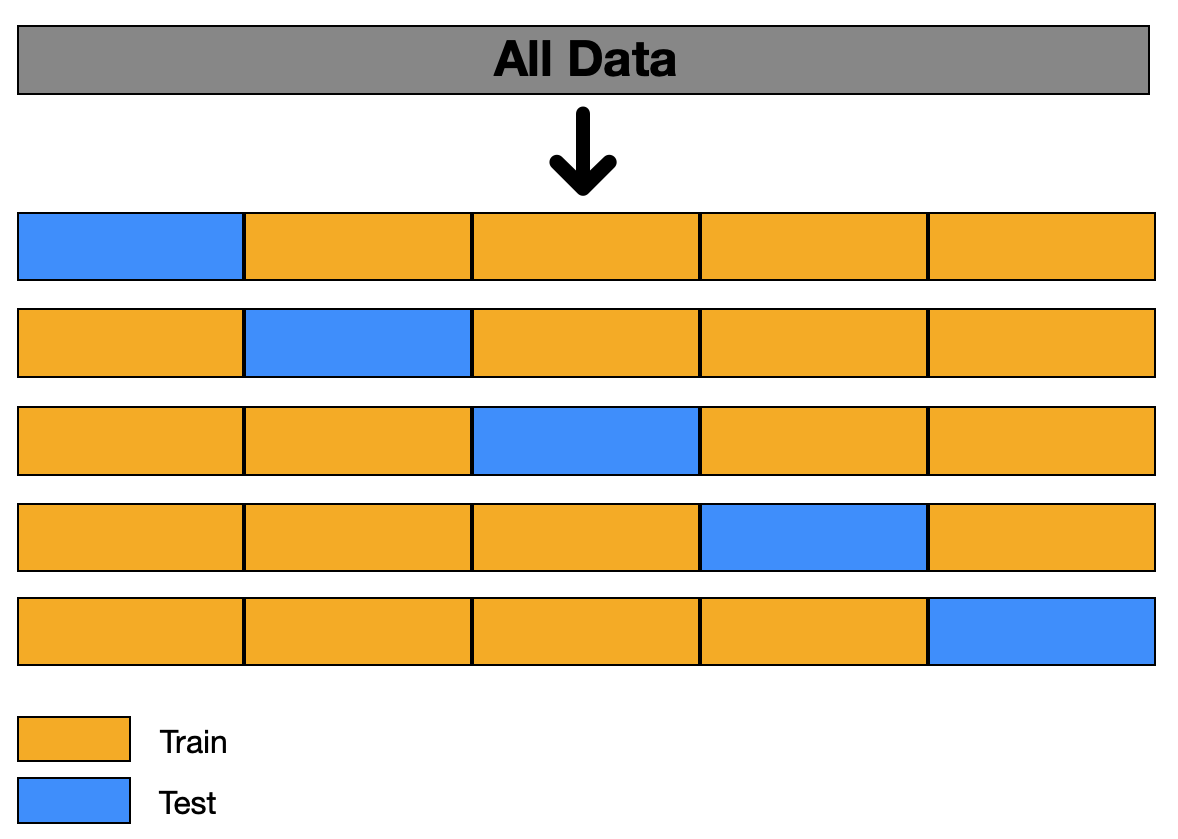
- 위의 figure에서 보이는 것과 같이 전체 dataset을 k-1 번 접어주면(fold) k 개의 fold로 분할될 것입니다. 위의 예시는 데이터셋을 4번 접어서 5-fold dataset을 만들어 준 경우입니다.(대다수의 경우에는 5-fold, 또는 10-fold를 사용합니다)
- 이렇게 나누어진 dataset을 통해 모델을 학습할때에, 각 iteration마다 test set을 위와 보이는 것과 같이 중복 없이 다르게하여 모델의 training과 testing을 반복합니다. 위 예시의 경우 이를 5번 반복하게 되고, 각 test fold에서 나온 검증 결과를 평균내어 모델의 성능을 평가하는 것이 k-fold 기법입니다.
- 이런 방법으로 dataset을 분할하여 사용한다면 데이터 양이 적을때 모델이 각기 다른 train과 test data를 학습하고 평가받게 되어 overfitting을 방지할 수 있을 뿐만 아니라 다양한 데이터에 대한 학습을 진행할 수 있다는 장점이 있습니다. 하지만 iteration 횟수가 많아지기 때문에 학습에 걸리는 시간이 늘어난다는 단점 또한 존재합니다.
데이터의 특성에 따라
- 머신러닝과 딥러닝은 최근 정말 다양한 분야에 활용되고 있기 때문에, 우리는 다양한 종류와 각기 다른 성질을 가진 데이터를 다루게 되었습니다. 그래서 우리가 어떠한 데이터를 가지고 모델을 개발 할 것 인지에 따라서 dataset splitting 하는 방식이 조금씩 달라질 수 있습니다.
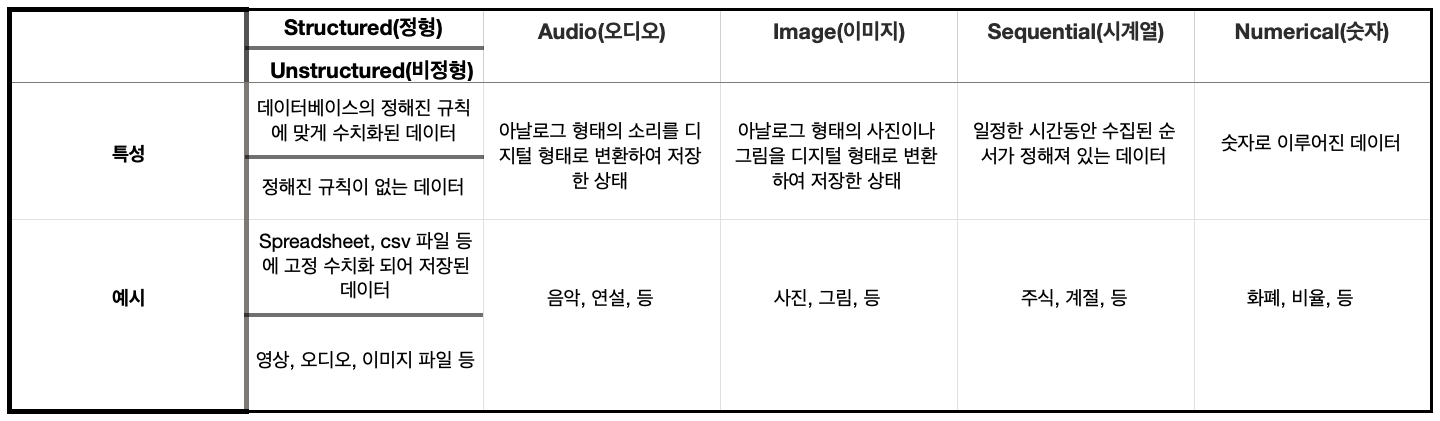
- 위에서 보여지는 다양한 데이터의 특성들 중 시계열 데이터로 예시를 들어보겠습니다. 우리가 만들고자 하는 모델이 주가를 예측하는 모델이라고 가정해 보겠습니다. 주가는 시간의 흐름에 따라 변할 것이고, 우리가 사용할 데이터 또한 각 시간별 주가가 저장된 데이터셋일 것 입니다. 이렇게 데이터의 순서가 의미있고 중요한 데이터를 시계열 데이터라고 부릅니다. 이와 같이 순서가 중요한 데이터를 다루는데, dataset splitting을 한다고 데이터를 무작위로 섞어버린다면 우리의 모델이 의미있는 학습을 하는것은 불가능해지겠죠? 그래서 이렇게 시계열 데이터를 사용하여 모델을 학습시킨다고 한다면, 데이터를 random 하게 섞지 않고, 시간의 흐름에 따라 달라지는 데이터를 모델이 학습할 수 있도록 해 주어야 합니다.
- 여기서는 시계열 데이터를 예시로 들었지만, 시계열 데이터 뿐만 아니라 다양한 데이터와 그의 성질에 따라 필요로 하는 dataset splitting 방법이 조금씩 달라질 수 있습니다. 따라서 데이터셋을 분할할때에 우리가 다루는 데이터는 어떤 성질을 가지고 있는지 고려할 필요가 있습니다.
데이터의 distribution과 target의 성질에 따라
- 데이터의 distribution과 target의 성질에 따라 데이터셋을 분할하는 방식이 조금씩 달라질 수 있는데, 더 이야기 하기에 앞서 여기서 말하는 distribution 과 target이 무엇을 의미하는지 알아보겠습니다.
- distribution: 데이터의 출처(web page, user uploaded images, 미국에서 collect한 데이터, 한국에서 collect 한 데이터, etc.)를 의미합니다.
- target: 우리가 모델을 통하여 해결하고자 하는 문제, 또는 모델이 좋은 성능을 낼 수 있도록 하는 목표를 의미합니다.
-
우리가 모델을 개발하고 연구할때, 모델을 통해 이루고자 하는 target 이 있을 것입니다. 이때, 모델이 배포된 이후에도 성공적인 모델을 만들기 위해서는 실제 application 에서 모델이 마주할 데이터와 가장 유사한 데이터를 validation set 과 test set 에 할당하는 것이 중요합니다. 여기서 말하는 실제 상황에서 마주할 데이터와 유사한 데이터란, 모델이 실제로 사용되었을때 마주할 데이터의 distribution 을 의미합니다. 예를들어, 한국에서 사용할 어플을 만들기 위해 모델을 개발한다고 가정해 보겠습니다. 여기서 우리가 한국뿐만 아니라 미국, 남아프리카공화국, 프랑스 등의 국가에서(즉, 다른 distribution) 데이터를 수집하여 모델을 학습시킨다면 우리가 만든 모델이 한국에서 사용되었을때의 성능은 한국에서만 수집한 데이터를 사용하여 모델을 개발했을때 보다 좋지 않을 것입니다.
-
만약 데이터가 충분하다면 이러한 고민을 할 필요가 없습니다. 우리의 target에 적합한 데이터를 가지고 올때에, train, validation, test 모두 같은 distribution에서 가지고 오도록 하면 됩니다. 하지만 우리의 target에 적합한 데이터가 부족하여 같은 distribution을 가지게 하는 것이 불가능 한 경우도 있을 것입니다. 이때 우리에겐 두가지 선택지가 존재합니다.
- 우리가 원하는 distribution에서 온 데이터셋을 a라고 부르고, 그 외의 다른 distribution 에서 오는 데이터셋을 b라고 가정해 보겠습니다.
- 첫째로는 a 와 b를 무작위로 섞은 뒤에 train, validation, test set 로 분할하는 것입니다.
- 장점: 전체 데이터가 같은 distribution 에서 오기 때문에, train, validation, test set 을 성질상 균일하게 나눌수 있습니다
- 단점: 실제로 모델이 사용될 distribution에서 오는 데이터가 아니기때문에, 우리가 사실상 원하는 target 에서는 멀어진 결과를 낳을 수 있고, accuracy 또한 떨어 질 수 있습니다
- 둘째로는 a 를 validation 과 test set 에 사용하고, train set 에는 b를 사용하는 것입니다.
- 장점: validation set 을 통해 얻은 결과를 모델이 실제로 사용 되었을때 와의 성능과 비슷할 것 이라고 받아드릴 수 있습니다.
- 단점: 모델이 학습된 train set 과 validation set 의 성질이 다를 수 있기 때문에 모델의 성능을 높이는데 시간이 다소 오래 걸릴 수 있습니다.
- 첫째로는 a 와 b를 무작위로 섞은 뒤에 train, validation, test set 로 분할하는 것입니다.
- 위의 두 가지 선택지가 존재하고, 각각의 장점과 단점 또한 존재하지만, 저희는 두 번째 option 을 선택하시는 것을 추천합니다. Train set 과 validation/test set 의 distribution을 다르게 하더라도 우리가 개발한 모델이 실제로 사용되었을때 성공적인 성능을 뽑아내는 것이 더욱 중요하기 때문입니다. 따라서 우리는 validation/test set 에 우리의 모델이 실상에 사용되었을때 마주할 데이터를 더욱 잘 reflect 할 수 있는 데이터셋을 할당하는 것이 더 좋다고 판단하기 때문입니다.
Evaluation Metric
마지막으로 모델을 훈련시키고 validation set에 대한 결과를 평가할때 사용되는 evaluation metric에 대해 간단히 알아보겠습니다.
“Evaluation metrics are used to measure the quality of the statistical or machine learning model.”
-
Dataset splitting 을 하고, train set 으로 학습한 모델이 validation set 을 통해 검증을 받을때에, 우리는 evaluation metric 을 통해 모델의 성능을 평가합니다. 여기서 evaluation metric 이란, 위에서 정의한 것과 같이, 우리가 만든 모델의 성능을 보다 효율적이고 정확하게 파악할 수 있도록 도와주는 기준입니다. 우리는 evaluation metric을 통해 모델이 실상에 적용 되었을때 좋은 성능을 낼 수 있을 것인지 판단할 수 있어야 합니다. 따라서 evaluation metric 을 잘 세우고 정하는 것이 중요하게 여겨지는 것입니다.
-
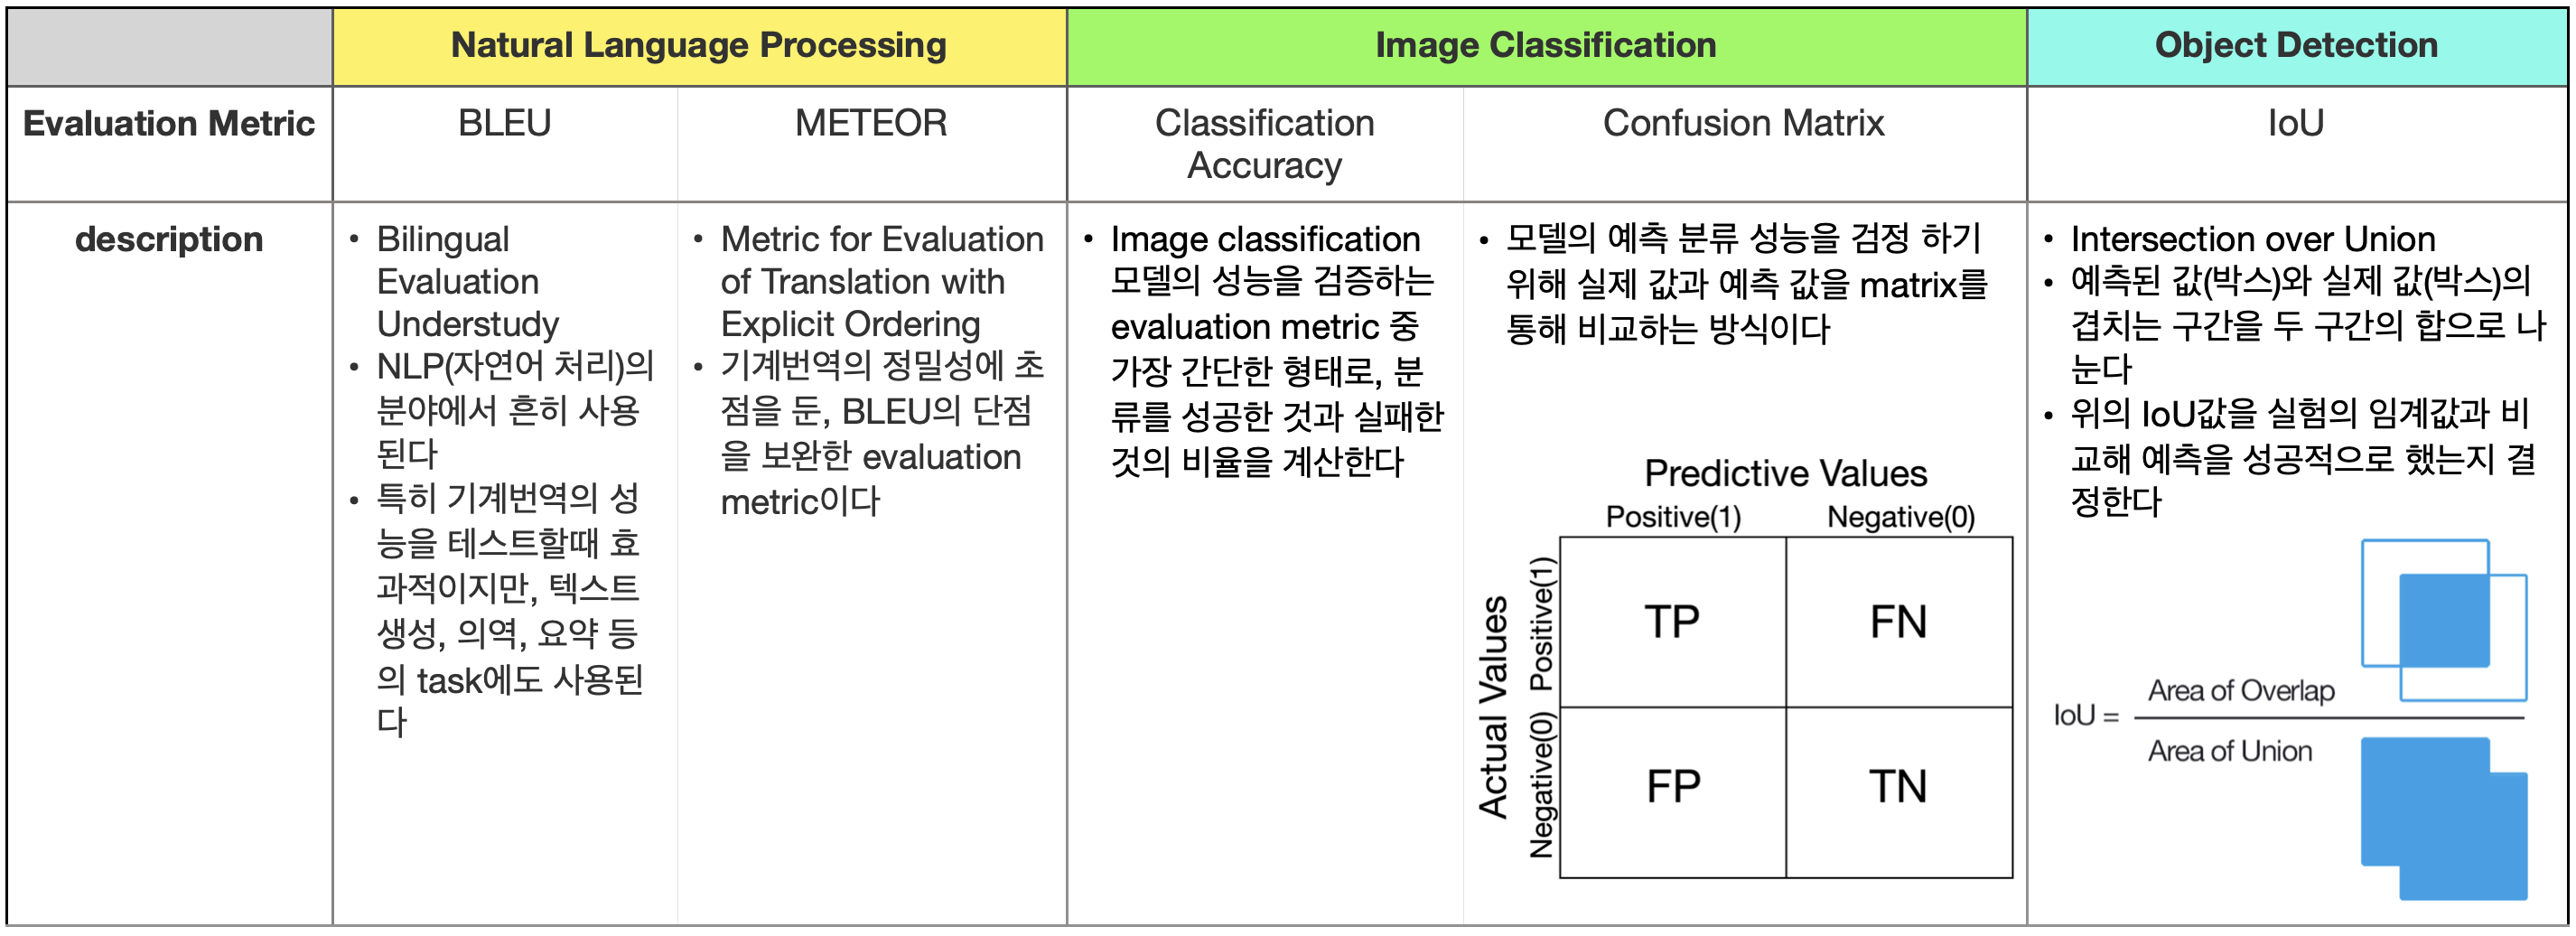
그렇다면 우리가 모델을 통해 해결하고자 하는 문제에 따라 적절한 evaluation metric이 조금씩 달라질 수 있겠죠? 다양한 machine learning의 분야, 그리고 task에 따라 흔히, 또는 대표적으로 사용되는 evaluation metric을 아래의 테이블을 통해 간단하게 소개해드리도록 하겠습니다.
- 우리가 만든 모델이 실제로 사용되었을때 얼마나 성공적일지 잘 보여주는 evaluation metric 을 잘 세웠다고 가정했을때, 이런 evaluation metric에 따른 결과가 좋지 않다면, dataset splitting을 효과적으로 했는지 다시한번 확인해 보는 것 또한 좋은 방법입니다. 데이터셋 분할이 효과적이고 적합하게 이루어지지 않았다고 판단된다면, 데이터셋을 다시 분할하여 사용하는 것 또한 모델의 성능을 향상시키는데에 도움이 될 수 있습니다.
Code
- 마지막으로 지금까지 이야기했던 dataset splitting이 코드상에서는 어떻게 이루어지는지 간단하게 알아보겠습니다. 우리는 어떤 라이브러리를 사용하여 데이터를 분할하는지에 따라 그 방법은 정말 다양합니다. 여기서는 MNIST 데이터셋의 분할에 대해 알아보고, 일반적인 tensor를 분할시키는 간단한 코드 또한 알아보겠습니다.
- 코드를 보기에 앞서 MNIST가 어떤 데이터셋인지 간단하게 알아보겠습니다.
- MNIST: image files of hand-written numbers from 0 to 9 in black&white, 28x28 pixel
- Total Dataset: 70,000
- Training set: 60,000
- Test set: 10,000
- 코드를 보기에 앞서 MNIST가 어떤 데이터셋인지 간단하게 알아보겠습니다.
-
MNIST는 위에서 보이는 것과 같이 데이터의 양이 많지 않을 뿐더러, 데이터의 구조가 매우 간단한 데이터셋입니다. 28x28의 픽셀로 이루어진 흑백 이미지 파일의 데이터셋인데, 사람이 수기로 적은 0부터 9까지의 숫자가 적힌 데이터셋입니다. 전체 데이터셋의 크기는 70,000으로, 그 양이 많지 않기 때문에 앞서 설명드린 것과 같이 8:2, 또는 6:2:2 비율로 데이터셋을 분할하는 것이 효과적이라고 판단 할 수 있습니다. 매우 간단한 데이터의 구조 덕분에, MNIST를 사용하여 숫자 0부터9를 분할하는 모델을 만들때에, 복잡한 신경망을 필요로 하지 않습니다. 뿐만 아니라, training, validation, test set으로 나눌필요 없이, training set과 test set으로만 나누어 준다고 하더라도 충분히 학습이 효과적으로 이루어지는 데이터셋입니다. 따라서 MNIST는 전체 7만개의 데이터중 80%는 training set, 그리고 20%는 test set 으로 나누어진 상태로 배포됩니다.
- 위 설명을 듣고 “MNIST라는 데이터셋은 매우 간단하고 그 크기 또한 작기 때문에 8:2의 비율로 나누는 것이 가장 효과적이고, 그래서 배포될때에 이미 나누어져서 배포되는구나!” 라고 생각하셨다면, MNIST와 그에 맞는 효과적인 데이터셋 분할을 이해하신겁니다. 지금부터는 pytorch에서 제공하는 torchvision.dataset을 통해 각 training set 과 test set 을 불러오는 코드를 살펴보겠습니다.
#먼저 필요한 라이브러리를 가져옵니다.
import torch
import torchvision.datasets as dsets
import torchvision.transforms as transforms

#torchvision.dataset 을 통해 MNIST 데이터를 다운로드 하고, train 과 test set 을 각 객체에 저장합니다.
mnist_train = dsets.MNIST(root = “MNIST_data/.”, train=True, transform=transforms.ToTensor(), download=True)
mnist_test = dsets.MNIST(root = “MNIST_data/.”, train=False, transform=transforms.ToTensor(), download=True)


#다운로드한 데이터를 data_loader 통해 가져옵니다
data_loader = torch.utils.data.DataLoader(dataset=mnist_train, batch_size=batch_size, shuffle = True, drop_last=True)
- 우리가 모델을 개발할때에 MNIST와 같이 간단한 데이터만을 사용하지는 않을 것입니다. 그래서 dataset splitting이 되어있는 데이터를 가져오는 경우가 아닌, 우리가 직접 dataset splitting 을 진행 하는 경우의 코드를 보여드리겠습니다. 아래에서는 numpy를 이용하여 임의로 dataset 을 만들고, scikit-learn 라이브러리를 이용하여 간단하게 데이터셋을 분할하는 예시를 보여드리겠습니다.
#필요한 라이브러리를 가져옵니다.
import numpy as np
from sklearn.model_selection import train_test_split

#아래 보이는 것이 임의로 만들어낸 각 (20,4) 와 (20, 1)의 shape을 가진 데이터셋입니다.
x_data = np.array([
    [2, 1, 4, 2],
    [3, 2, 15, 1],
    [3, 4, 7, 11],
    [5, 15, 8, 5],
    [7, 5, 2, 9],
    [2, 5, 1, 8],
    [8, 9, 3, 6],
    [9, 10, 6, 8],
    [6, 12, 13, 1],
    [9, 2, 18, 32],
    [6, 10, 12, 2],
    [2, 4, 7, 15],
    [15, 6, 2, 7],
    [16, 2, 6, 1],
    [10, 8, 2, 6],
    [13, 12, 11, 2],
    [5, 9, 1, 12],
    [16, 18, 3, 15],
    [12, 1, 8, 3],
    [6, 2, 9, 16]
])
y_data = np.array([3, 5, 7, 10, 12, 7, 13, 13, 12, 13, 12, 6, 13, 6, 6, 2, 17, 12, 2, 9])

#scikit-learn 라이브러리에서 제공하는 train_test_split 함수를 이용하여 데이터를 분할합니다.
#parameter test_size는 전체 테이터셋에서 test set가 차지하는 비율을,
#shuffle은 데이터를 무작위로 섞을것인지, 그리고 random_state는
#데이터를 무작위로 섞을때 reproducibility를 위한 난수의 초기값을 설정해 줍니다.
x_train, x_test, y_train, y_test = train_test_split(x_data, y_data, test_size=0.2, shuffle=True, random_state=777)

#train set 을 한번 더 나누어서 validation set 또한 만들어 낼 수 있습니다.
x_train, x_val, y_train, y_val = train_test_split(x_train, y_train, test_size=0.25, shuffle=True, random_state=777)

#최종적으로 분할된 각 test, validation, test set 을 모두 출력해 보겠습니다.
print("x_train:", x_train)
print("y_train:", y_train)
print("x_val:", x_val)
print("y_val:", y_val)
print("x_test:", x_test)
print("y_test:", y_test)
x_train: [[ 5 15 8 5] [16 18 3 15] [ 8 9 3 6] [13 12 11 2] [ 7 5 2 9] [ 3 4 7 11] [ 6 2 9 16] [ 2 1 4 2] [ 9 10 6 8] [ 6 12 13 1] [16 2 6 1] [ 6 10 12 2]]
y_train: [10 12 13 2 12 7 9 3 13 12 6 12]
x_val: [[ 5 9 1 12] [ 9 2 18 32] [12 1 8 3] [ 2 5 1 8]]
y_val: [17 13 2 7]
x_test: [[10 8 2 6] [15 6 2 7] [ 2 4 7 15] [ 3 2 15 1]]
y_test: [ 6 13 6 5]
정리
이번 포스팅을 통해 우리는 dataset splitting이 무엇이고, 그 중요성에 대해 알아보았습니다. Train, validation, 그리고 test set 각각의 역할과 차이점에 대해 이야기 하고, 기존의 데이터셋을 분할하던 방식과 최근의 트렌드, 그리고 우리가 dataset splitting을 할때에 고려해야할 다양한 요소들에 대해 설명드리면서 간단한 코드 예시까지 보여드렸습니다. 설명드린 내용 외에도 딥러닝 모델을 개발할때에 우리가 데이터를 어떻게 다루고 사용 할 것인지는 매우 중요한 부분이기 때문에, 추후에 다른 분할방식이나 각 데이터셋들의 특성들에 대하여 공부하시면 좋겠습니다.
Reference
- https://ganghee-lee.tistory.com/38
- https://www.youtube.com/watch?v=M3qpIzy4MQk
- https://www.youtube.com/watch?v=1waHlpKiNyY
- https://velog.io/@recoder/Cross-Validation
- https://en.wikipedia.org/wiki/Data
- https://deepai.org/machine-learning-glossary-and-terms/evaluation-metrics
- https://towardsdatascience.com/the-most-common-evaluation-metrics-in-nlp-ced6a763ac8b
- https://medium.com/analytics-vidhya/evaluation-metrics-for-classification-models-e2f0d8009d69
- https://kharshit.github.io/blog/2019/09/20/evaluation-metrics-for-object-detection-and-segmentation